source : https://drive.google.com/file/d/0BwuzhQPqnYM_cWhXbDhyOUZzeVk/view


Building a chat application for Android
Learn More
Overview
In this codelab you’ll build a chat application for Android using Firebase and Android Studio.
We’ll allow users to log in with an email/password combination.
What you’ll learn
- Interacting with a Firebase Database from an Android application.
- Using Firebase Authentication in an Android application to authenticate users.
What you’ll need
- Android Studio version 1.2+
- A test device or emulator with Android 4.1+
- The device must have internet access to access the Firebase servers
- While we'll show you what to do in Android Studio, this codelab does not try to explain how Android works.
Create a Firebase application
The first step is to create a Firebase application. This will be the server-side component that our Android application talks to.
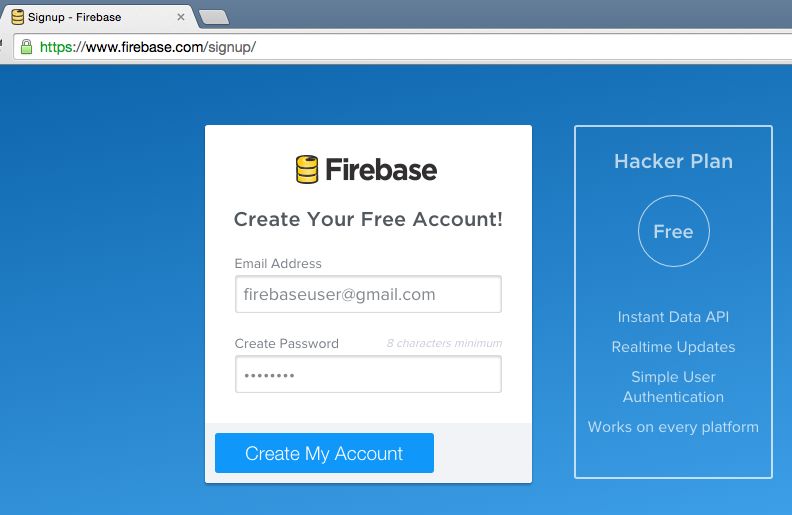
- Go to the Firebase web site
- Login or sign up
- Manage the app that was automatically created for you
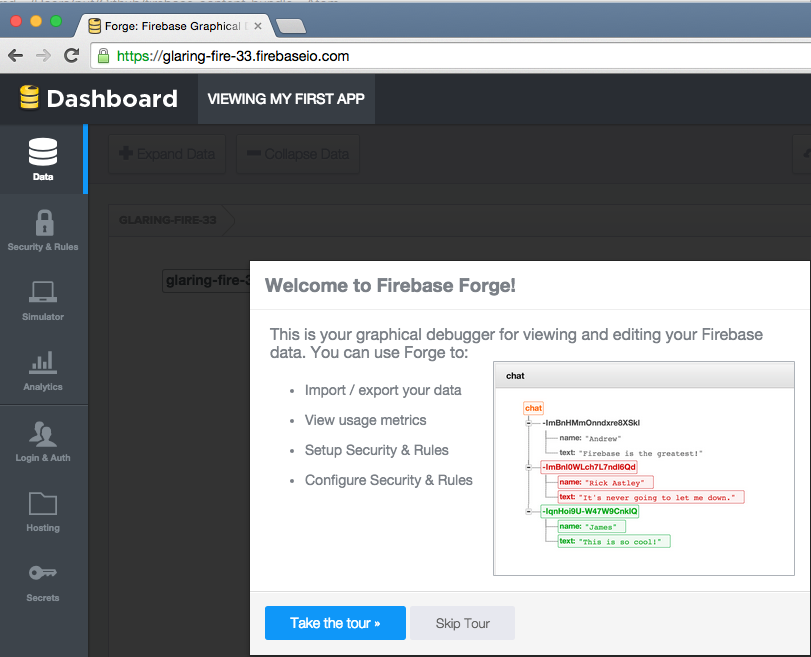
This app is on Firebase's free hacker plan. This plan is great for when you're developing your app on Firebase.

- Any data that our Android application writes, will be visible in the Data tab
- In the Login & Auth tab, enable Email & Password authentication

Create a project in Android Studio
In this step we’ll create a project in Android Studio.
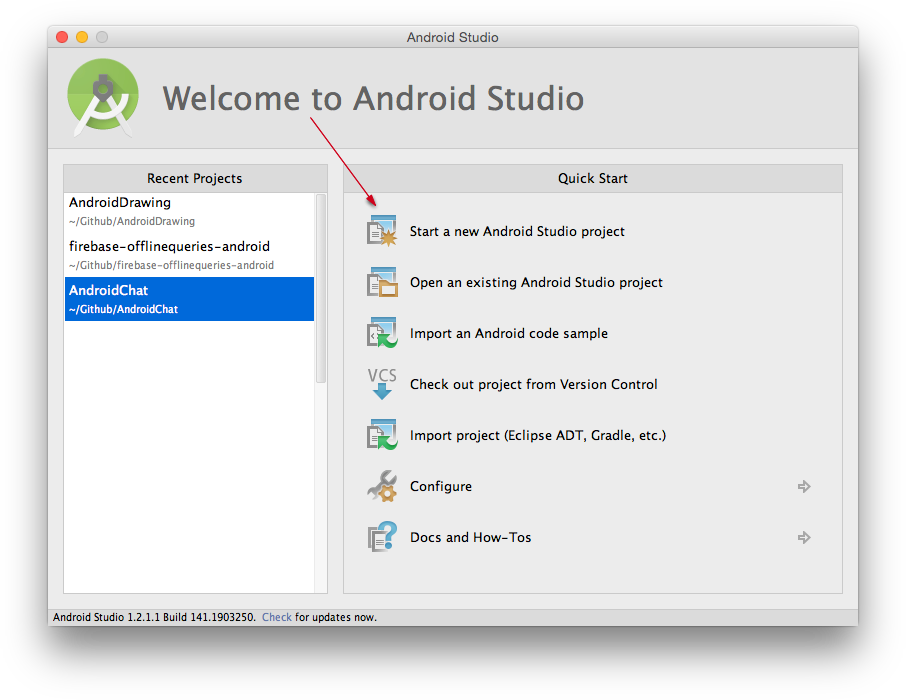
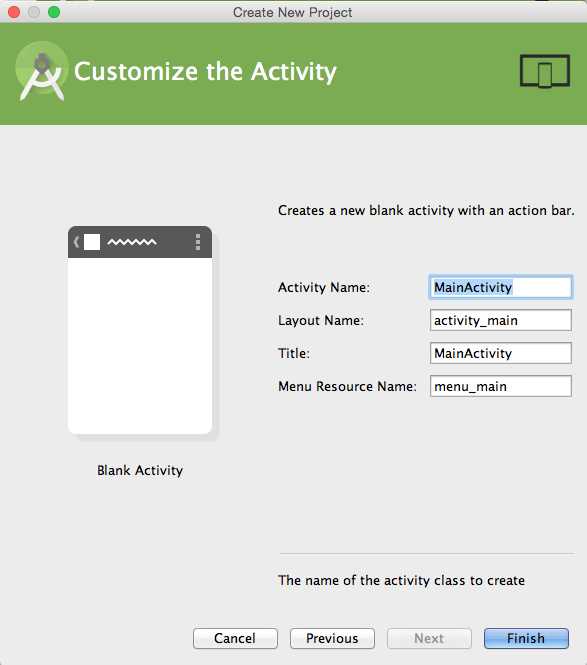
- Start Android Studio and Start a new Android Studio project
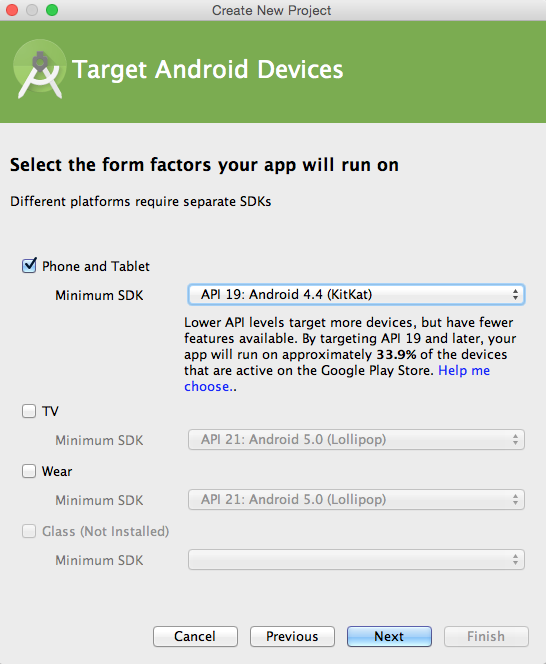
You can name the project anything you want. But in the code below, we’ve named it Nanochat

- Set the minimum SDK to 15 (ICS) or higher. We've left it on 19 (KitKat) here.
- Start with a Blank Activity
- We’ll leave all the defaults for this activity
- If the project outline is not visible on the left, click the 1:Project label
- Open up the main activity, which can be found in app/res/layout/activity_main.xml. In this file the root element will be a RelativeLayout and in there will be a TextView. We won’t be using the TextView, so delete it (or leave it and put a welcome message in it).


We now have a blank project in Android Studio. Let’s wire our app up to Firebase!
Connect the Android project to Firebase
Before we can start writing code that interacts with our Firebase database, we’ll need to make Android Studio aware that we’ll be using Firebase. We need to do this in two places: in the gradle build script and in our AndroidManifest.xml.
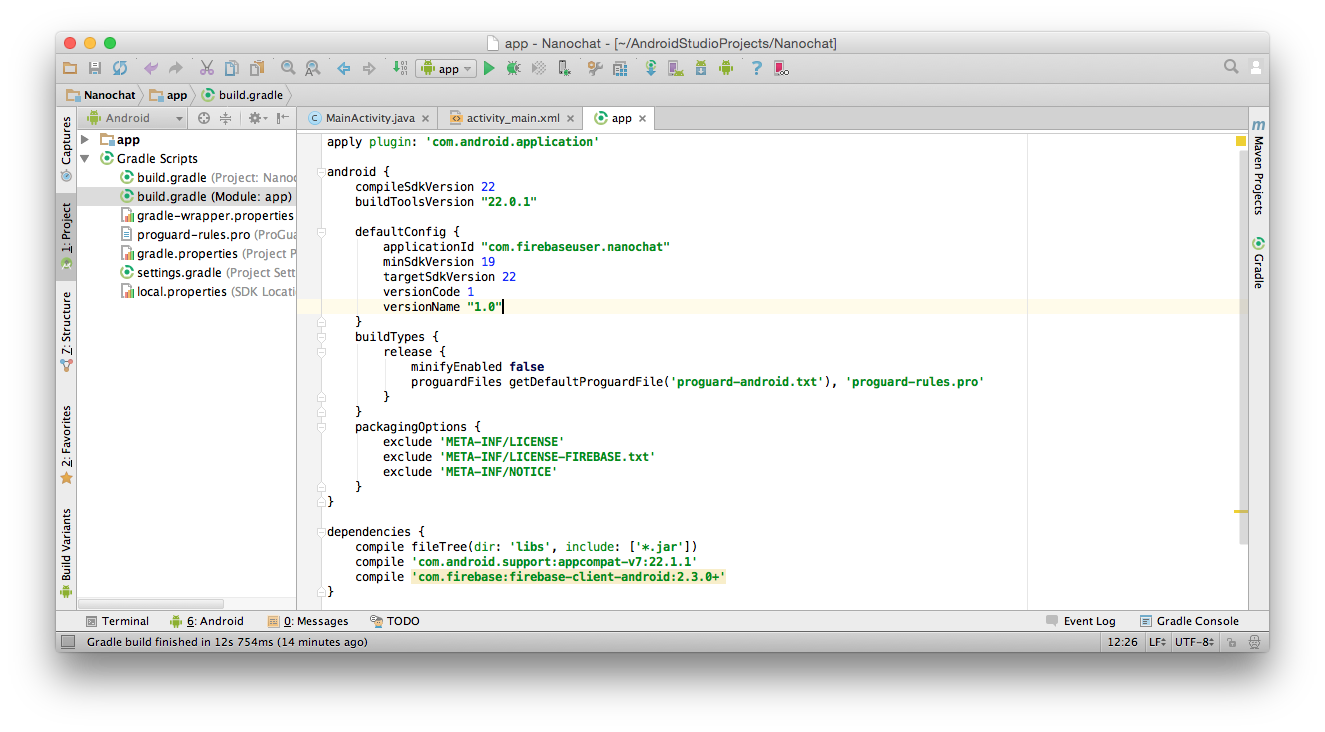
- open Gradle Scripts > build.gradle (Module: app)
This file contains the steps that Android Studio uses to build our app. We'll add a reference to Firebase to it, so we can start using it. - add the following line to the dependencies object at the bottom:
compile 'com.firebase:firebase-client-android:2.3.0+' - add the following to the bottom of the android object
packagingOptions {
exclude 'META-INF/LICENSE'
exclude 'META-INF/LICENSE-FIREBASE.txt'
exclude 'META-INF/NOTICE'
} - at this stage you’ll probably need to synchronize the project with the gradle files again, so Tools > Android > Sync Project with Gradle Files. Android Studio will parse the gradle files and pick up our changes.
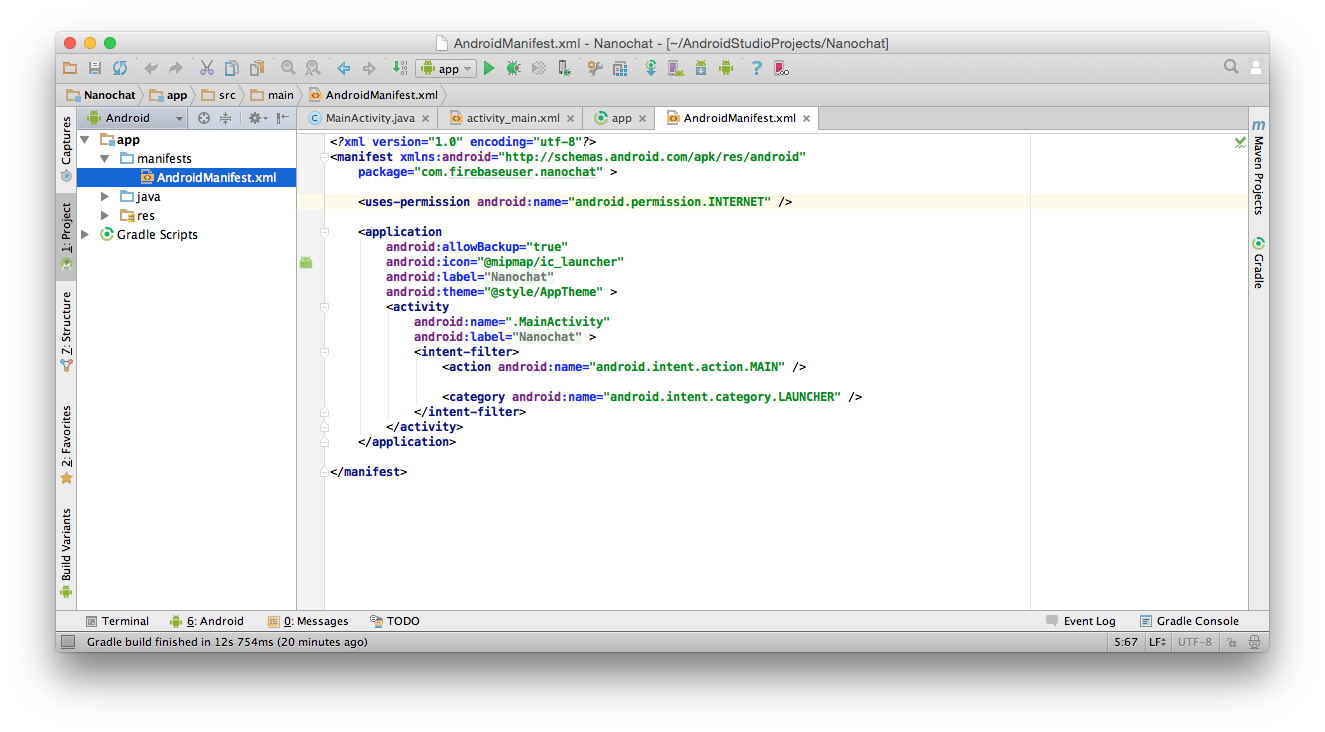
- since Firebase is a hosted service, our app will need to be able to access the internet.
- open app > manifests > AndroidManifest.xml
- add this line inside the manifest element
<uses-permission android:name="android.permission.INTERNET" /> - In this step we’ll also set up the initial connection between our code and its Firebase backend.
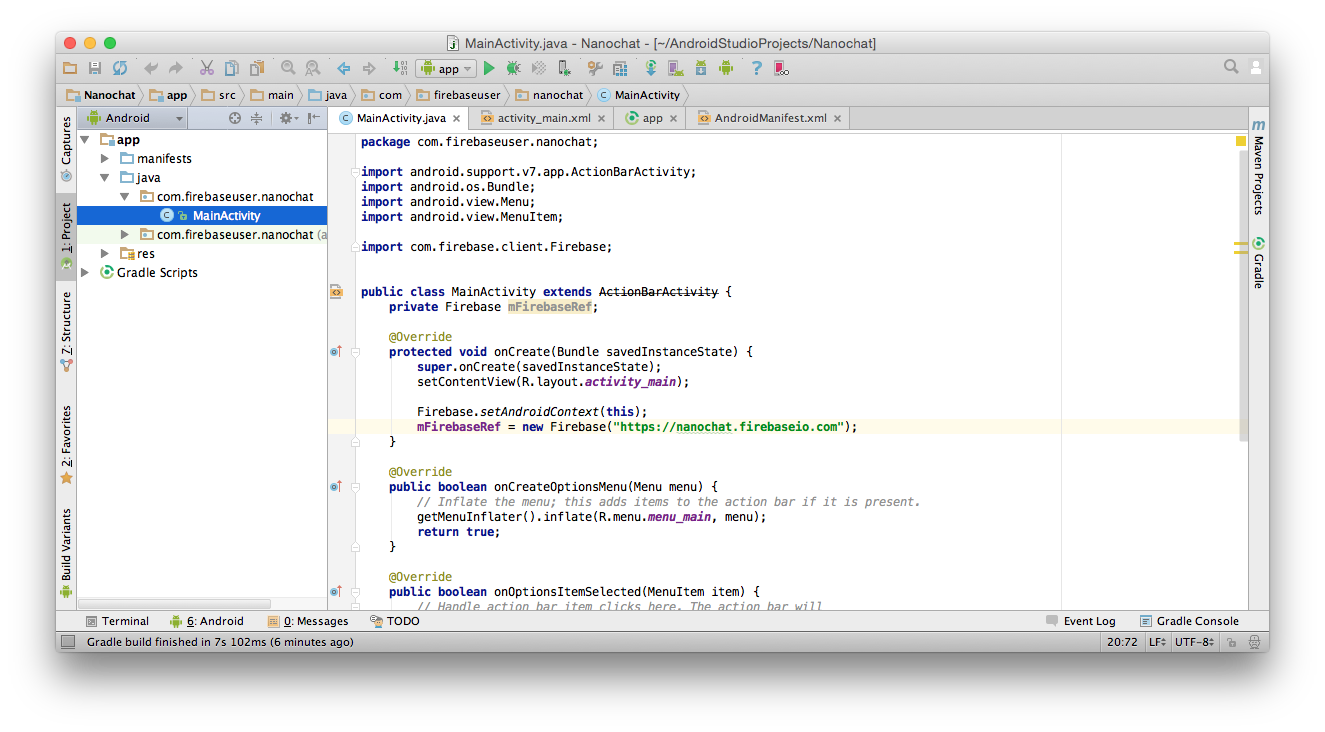
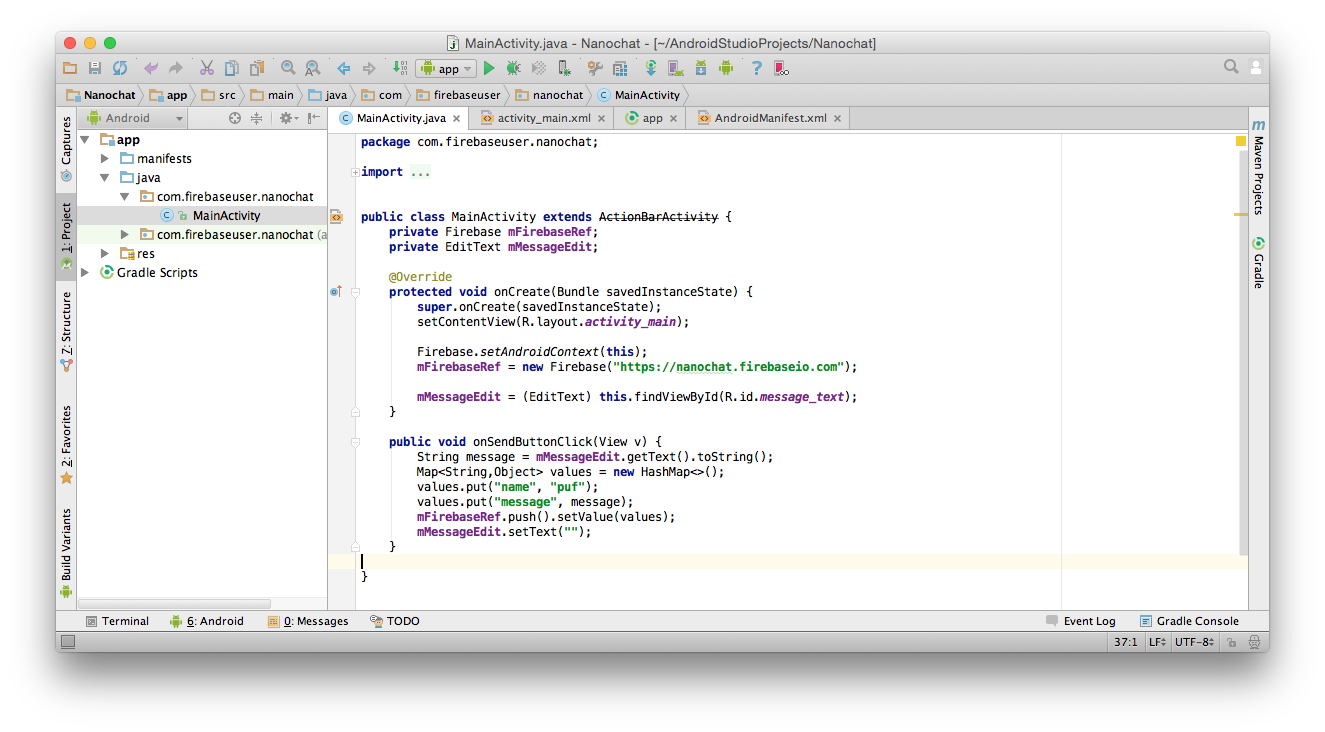
- open MainActivity.java and add this code to the end of the onCreate method:
Firebase.setAndroidContext(this);
This code allows the Firebase client to keep its context. - If Android Studio is having trouble finding the Firebase class, be sure that you’ve added the line to your gradle file and have synchronized the build file with the project.
- We also want to create a connection to our database. We’ll keep this connection in a member field:
private Firebase mFirebaseRef;
that we initialize in onCreate:
mFirebaseRef = new Firebase("https://<your-app>.firebaseio.com");
Be sure to replace `<your-app>` with the name of the Firebase app you created in the first section.
That’s all the setup that is required. Next up we’ll allow the user to enter a message in our app and send the message to Firebase.
Allow the user to send a message
We’re finally getting to the meat of our project. In this step we’ll allow the user to enter a message in a text box. When they then click the Send button, we will send the message to Firebase.
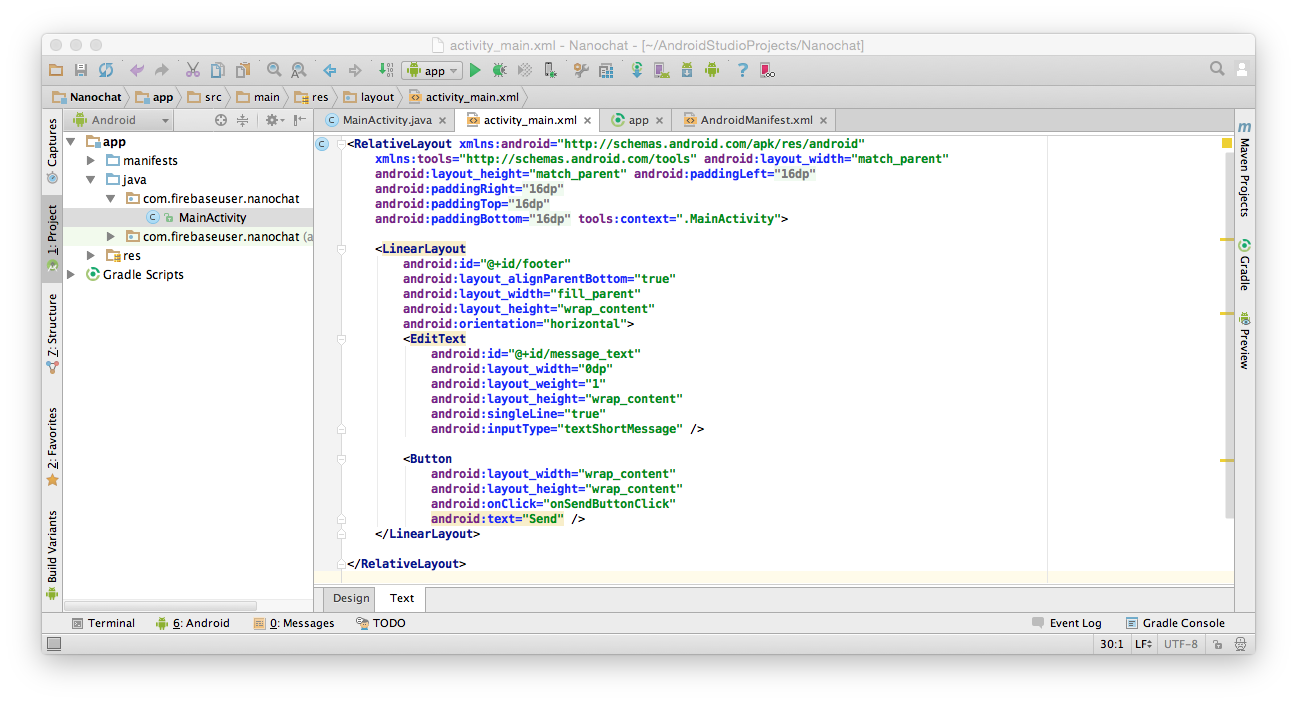
- We’ll first add the necessary views to activity_main.xml:
<LinearLayout
android:id="@+id/footer"
android:layout_alignParentBottom="true"
android:layout_width="match_parent"
android:layout_height="wrap_content"
android:orientation="horizontal">
<EditText
android:id="@+id/message_text"
android:layout_width="0dp"
android:layout_weight="1"
android:layout_height="wrap_content"
android:singleLine="true"
android:inputType="textShortMessage" />
<Button
android:layout_width="wrap_content"
android:layout_height="wrap_content"
android:text="Send" />
</LinearLayout>
So we have an EditText, where the user can enter their chat message, and a Button that they can click to send the message. - In our MainActivity.java we’ll now add a member field for the EditText and initialize it at the end of the onCreate method:
- Next, we’ll add a method that grabs the text from the input and send it to our Firebase database:
public void onSendButtonClick(View v) {
String message = mMessageEdit.getText().toString();
Map<String,Object> values = new HashMap<>();
values.put("name", "puf");
values.put("message", message);
mFirebaseRef.push().setValue(values);
mMessageEdit.setText("");
} - So we grab the message from the EditText, stuff it into a Map and send it off to Firebase. We’ll look at a way to replace that map with something more type-safe in the next section, but for now this will work.
Also note that we hard-coded our user name for the moment. We’ll grab the user name from Firebase Authentication in the last section of this code lab. - Now wire up the onSendButtonClick method to the button in main_acitivity.xml by adding this attribute to the button:
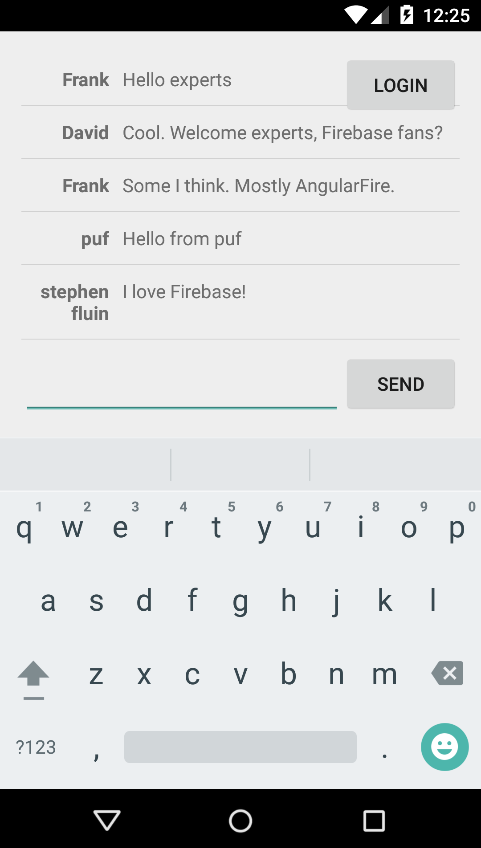
android:onClick="onSendButtonClick" - If you now run the application, you will see that it looks like the picture at the start of this section.
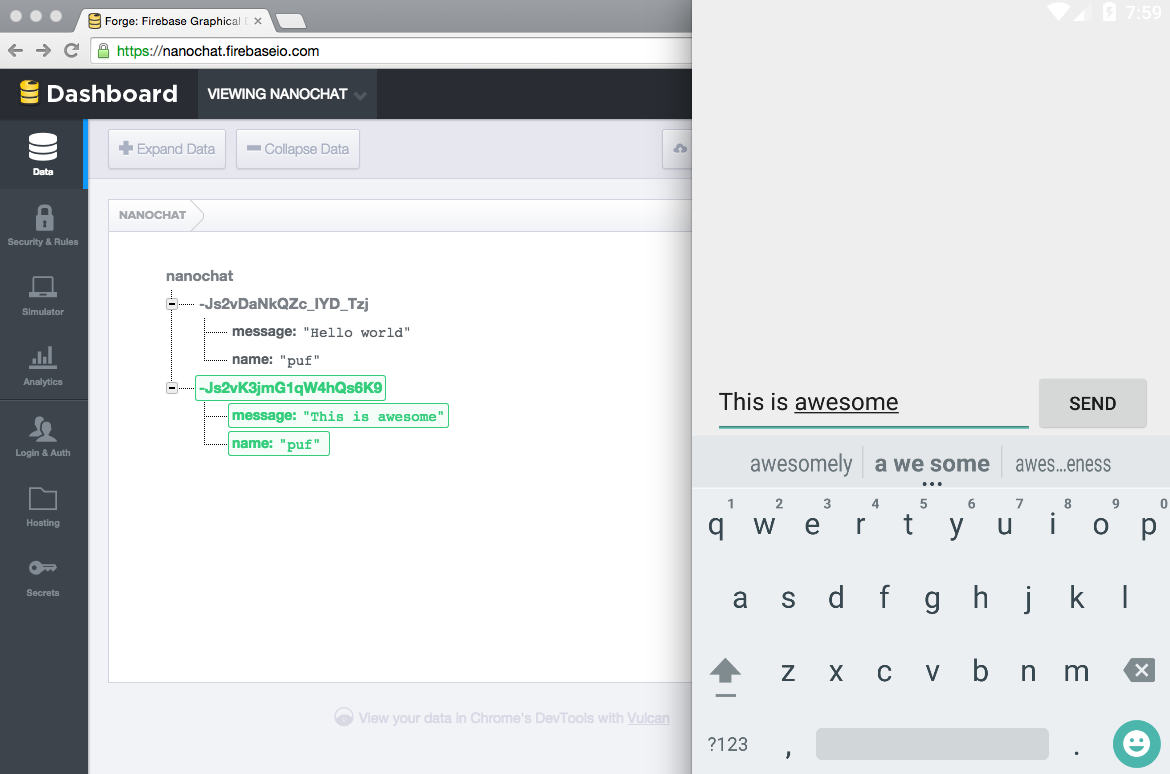
- Open the Data tab in the Firebase Dashboard of your app. You’ll see it light up green as you add new messages. Admit it, this is pretty cool!


Now that we can send messages to Firebase, it is time for the next step: making both existing and new messages show up in our Android app.
Show the (existing and new) messages
A chat app that doesn’t show existing messages is not very useful. So in this step we’ll add a list of the existing messages to our Android app. There’s a lot of ground we need to cover, so get ready for it. But at the end of this section we’ll have a fully functional chat app to show for it.
Let's take this in chunks: first you'll build a new layout that we use to display each message, then you'll create a Java class to represent each message and finally we'll get the message from Firebase and put them into a ListView.
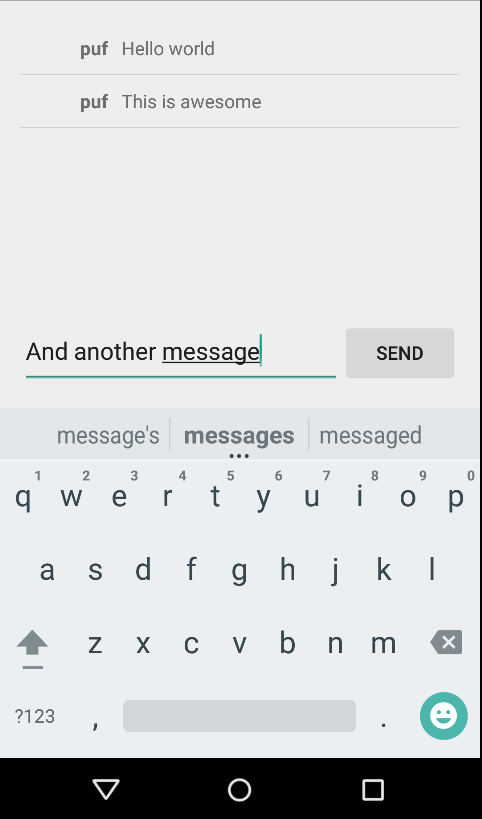
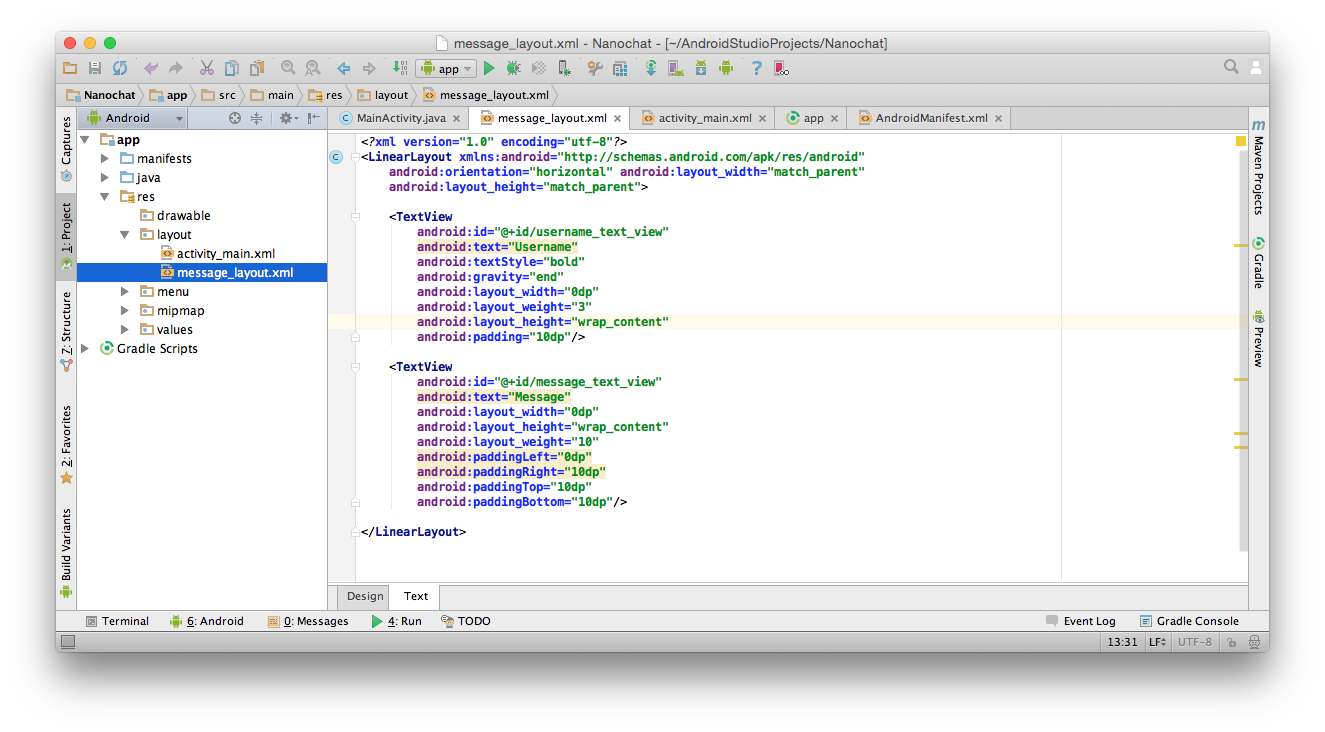
- As you can see in the screenshot, each chat message has the same layout. So we’ll create a new layout XML file for the messages.
- Create a new layout file message_layout.xml
- in the layout XML, change the orientation of the LinearLayout to horizontal
<LinearLayout xmlns:android="http://schemas.android.com/apk/res/android"
android:orientation="horizontal" android:layout_width="match_parent"
android:layout_height="match_parent"> - add two TextView controls to the layout: one for the username and one for the chat message:
<TextView
android:id="@+id/username_text_view"
android:text="Username"
android:textStyle="bold"
android:gravity="end"
android:layout_width="0dp"
android:layout_weight="3"
android:layout_height="wrap_content"
android:padding="10dp"/>
<TextView
android:id="@+id/message_text_view"
android:text="Message"
android:layout_width="0dp"
android:layout_height="wrap_content"
android:layout_weight="10"
android:paddingLeft="0dp"
android:paddingRight="10dp"
android:paddingTop="10dp"
android:paddingBottom="10dp"/>
Most of these attributes are just there to make the messages look reasonable. So feel free to use your own padding and layout attributes. Just be sure to use the same R.id fields in your code that you specify in the android:id attributes in the XML.


- Now create a class ChatMessage.java that wraps the username and text message:
public class ChatMessage {
private String name;
private String message;
public ChatMessage() {
// necessary for Firebase's deserializer
}
public ChatMessage(String name, String message) {
this.name = name;
this.message = message;
}
public String getName() {
return name;
}
public String getMessage() {
return message;
}
}
As you can see, this is plain-old Java object. But it’s a POJO with some special traits. First ChatMessage follows a JavaBean pattern for its property names. The getName method is a getter for a name property, while getMessage is a getter for a message property. And second, those property names correspond to the ones we’ve been using when we sent messages to Firebase:
public void onSendButtonClick(View v) {
String message = mMessageEdit.getText().toString();
Map<String,Object> values = new HashMap<>();
values.put("name", "puf");
values.put("message", message);
mFirebaseRef.push().setValue(values);
mMessageEdit.setText("");
}
- With the layout for the message specified and their structure defined in a class, now you need to make a space for them in the main_activity.xml
- Add a ListView with android:id="@android:id/list" above the LinearLayout:
<ListView
android:id="@android:id/list"
android:layout_width="match_parent"
android:layout_height="match_parent"
android:layout_above="@+id/footer"/>
This is the container that all messages will be added to: one message_layout for each ChatMessage.
The id value is very important here and must be exactly as specified: @android:id/list. - Now download FirebaseListAdapter.java from https://github.com/firebase/AndroidChat/blob/master/app/src/main/java/com/firebase/androidchat/FirebaseListAdapter.java and add it to your project. This class adapts a Firebase collection so that it becomes usable in an Android ListView.
- Make the MainActivity class descend from ListActivity. This is a built-in Android base-class. By deriving from this, our activity will automatically have access to the ListView we added to the layout:
public class MainActivity extends ListActivity { - Now we'll make everything come together in the onCreate method of our MainActivity:
mListAdapter = new FirebaseListAdapter<ChatMessage>(mFirebaseRef, ChatMessage.class,
R.layout.message_layout, this) {
@Override
protected void populateView(View v, ChatMessage model) {
((TextView)v.findViewById(R.id.username_text_view)).setText(model.getName());
((TextView)v.findViewById(R.id.message_text_view)).setText(model.getMessage());
}
};
setListAdapter(mListAdapter);
So the FirebaseListAdapter maps the data from your Firebase database into the ListView that you added to the layout. It creates a new instance of your message_layout for each ChatMessage and calls the populateView method. You override this method and put the name and message in the correct subviews. - Don't worry, the worst part is behind us now. All that is left in this step is some clean-up. But before that, run your app and see that it shows all existing messages. And if you send a new message, it shows up in the emulator and in your Firebase dashboard.
- The cleanup is minor, but it's important to keep our code as clean as possible at all times. Remember that onSendButtonClick method that we had you write? That stuff with a Map looked a bit messy. Now that we have a ChatMessage class, we can make it a lot more readable:
public void onSendButtonClick(View v) {
String message = mMessageEdit.getText().toString();
mFirebaseRef.push().setValue(new ChatMessage("puf", message));
mMessageEdit.setText("");
}
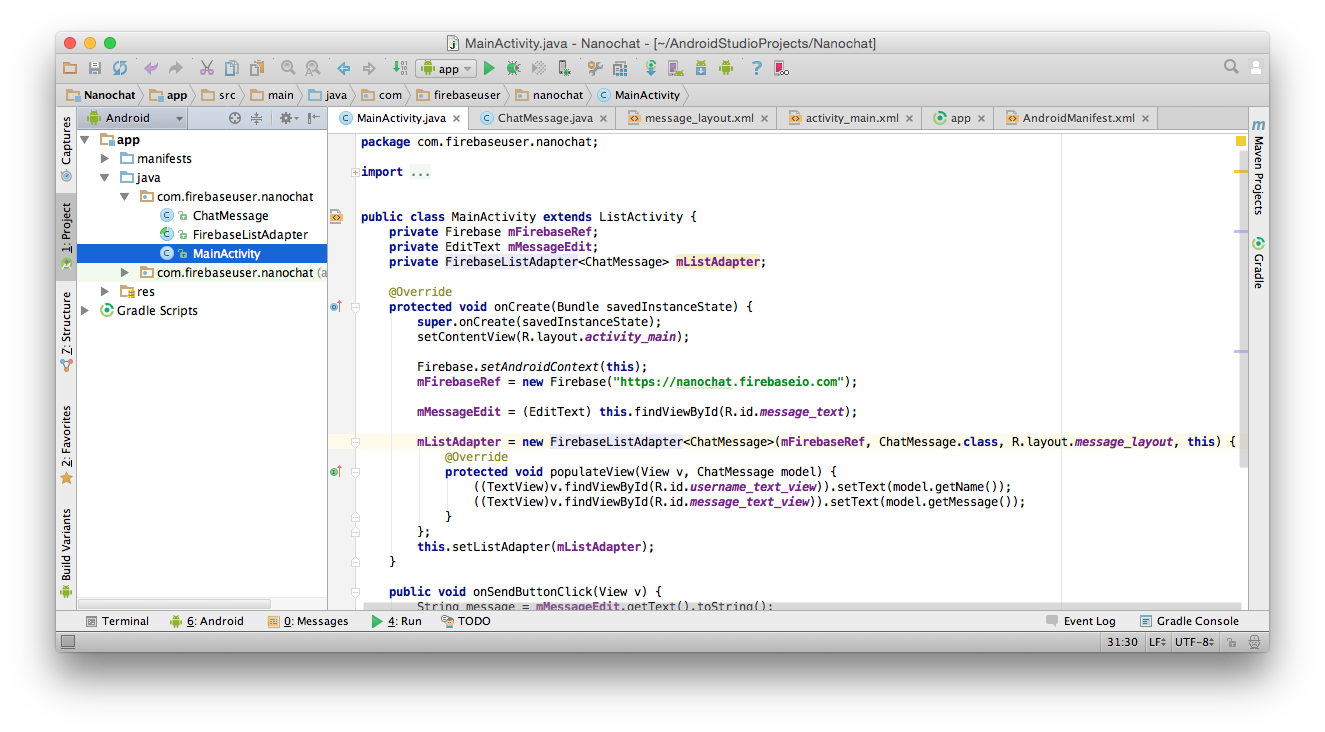

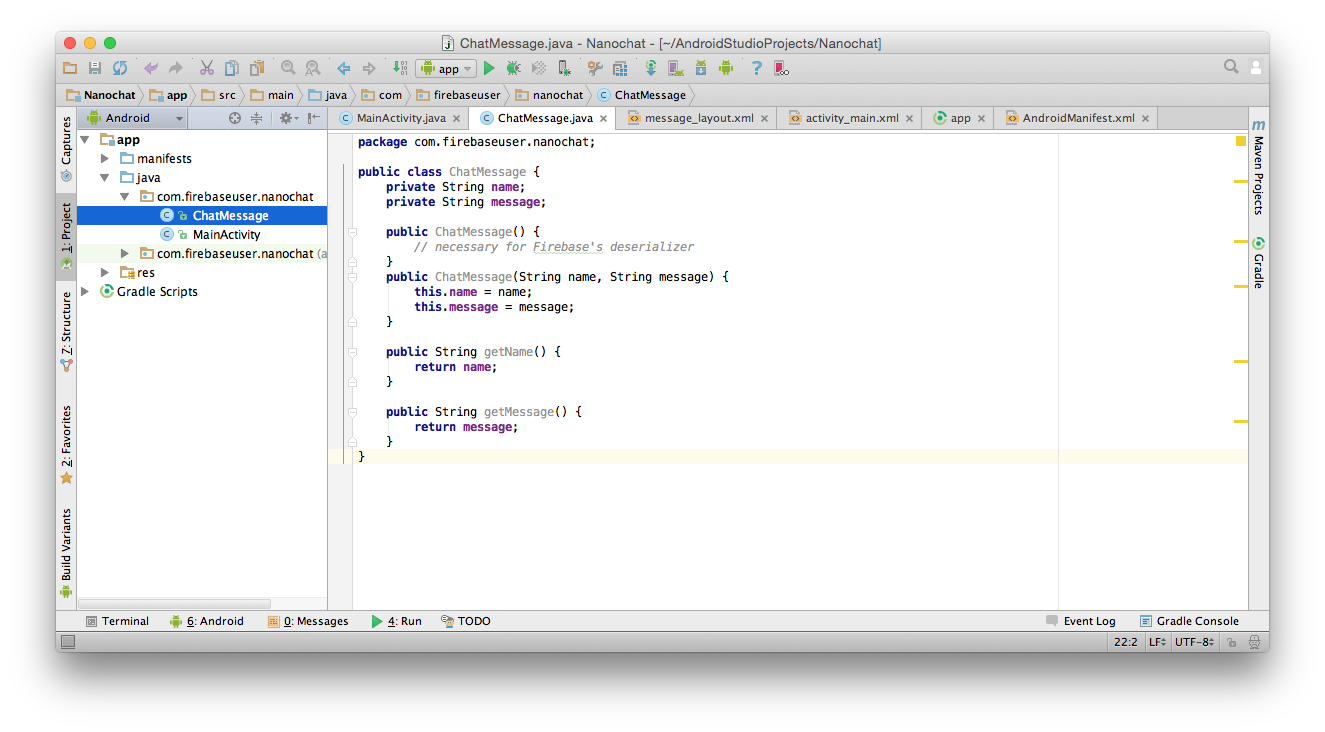
In this section we made our app show the chat messages. It was a lot of work, but in the end you can see that the Java code for our main activity still fits in a single screenshot.
Enable login
As a final step, we're going to allow the users of our app to log in using email and password.
- First add a button to the top right of activity_main.xml
<Button
android:layout_width="wrap_content"
android:layout_height="wrap_content"
android:text="Login"
android:id="@+id/login"
android:layout_alignParentTop="true"
android:layout_alignParentEnd="true"
android:onClick="onLoginButtonClick" />
Note that the button refers to an onLoginButtonClick method, which you'll create in a few minutes. - Now create a new layout called dialog_signin.xml, which we'll use to model the body of the sign-in dialog
<LinearLayout xmlns:android="http://schemas.android.com/apk/res/android"
android:orientation="vertical"
android:layout_width="wrap_content"
android:layout_height="wrap_content">
<EditText
android:id="@+id/email"
android:inputType="textEmailAddress"
android:layout_width="match_parent"
android:layout_height="wrap_content"
android:layout_marginTop="16dp"
android:layout_marginLeft="4dp"
android:layout_marginRight="4dp"
android:layout_marginBottom="4dp"
android:hint="Email" />
<EditText
android:id="@+id/password"
android:inputType="textPassword"
android:layout_width="match_parent"
android:layout_height="wrap_content"
android:layout_marginTop="4dp"
android:layout_marginLeft="4dp"
android:layout_marginRight="4dp"
android:layout_marginBottom="16dp"
android:hint="Password"/>
</LinearLayout>
So we have two EditText controls under each other. The rest of the popup will be handled by a stock Android dialog.

Since your app will display the sign-in dialog as a popup, add the handling to MainActivity.java:
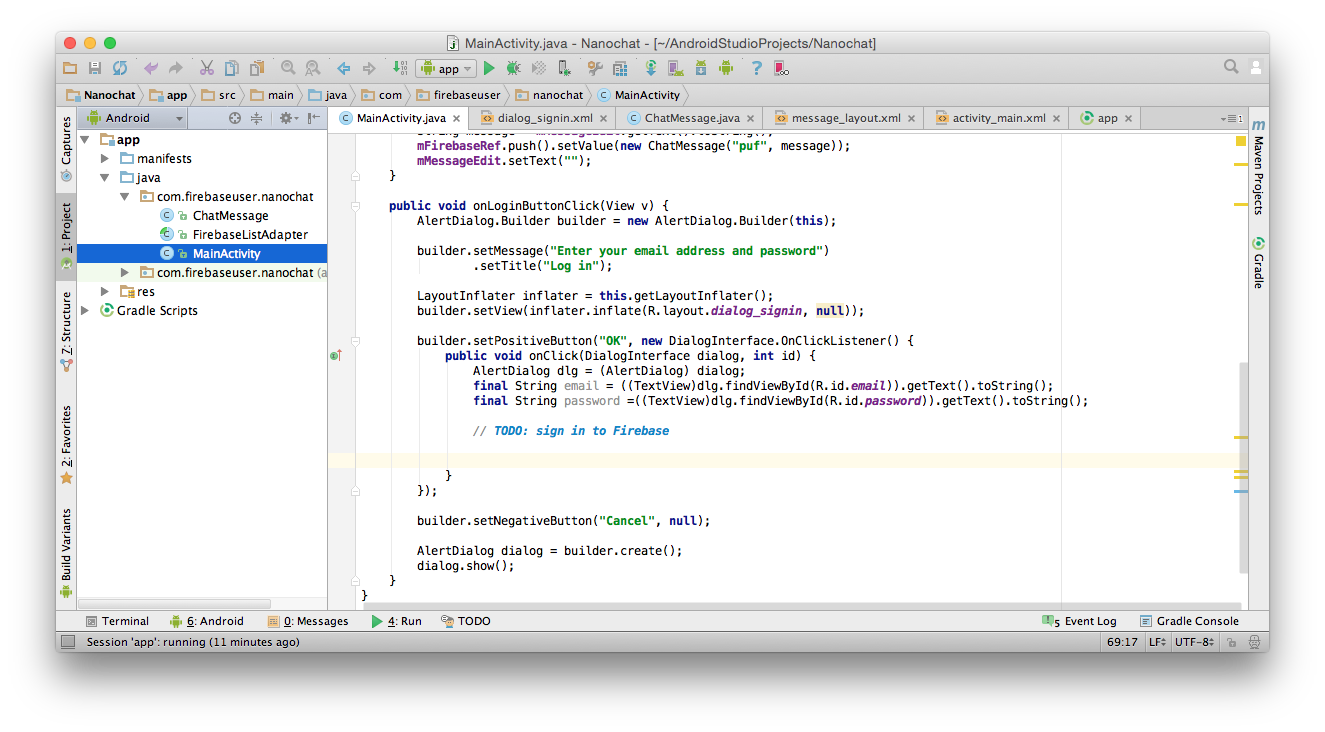
public void onLoginButtonClick(View v) {
AlertDialog.Builder builder = new AlertDialog.Builder(this);
builder.setMessage("Enter your email address and password")
.setTitle("Log in");
LayoutInflater inflater = this.getLayoutInflater();
builder.setView(inflater.inflate(R.layout.dialog_signin, null));
builder.setPositiveButton("OK", new DialogInterface.OnClickListener() {
public void onClick(DialogInterface dialog, int id) {
AlertDialog dlg = (AlertDialog) dialog;
final String email = ((TextView)dlg.findViewById(R.id.email)).getText().toString();
final String password =((TextView)dlg.findViewById(R.id.password)).getText().toString();
// TODO: sign in to Firebase
}
});
builder.setNegativeButton("Cancel", null);
AlertDialog dialog = builder.create();
dialog.show();
}
This method builds and show the dialog, with our two text boxes as the main body. When the user clicks OK, it extracts the email address and password from the text controls.
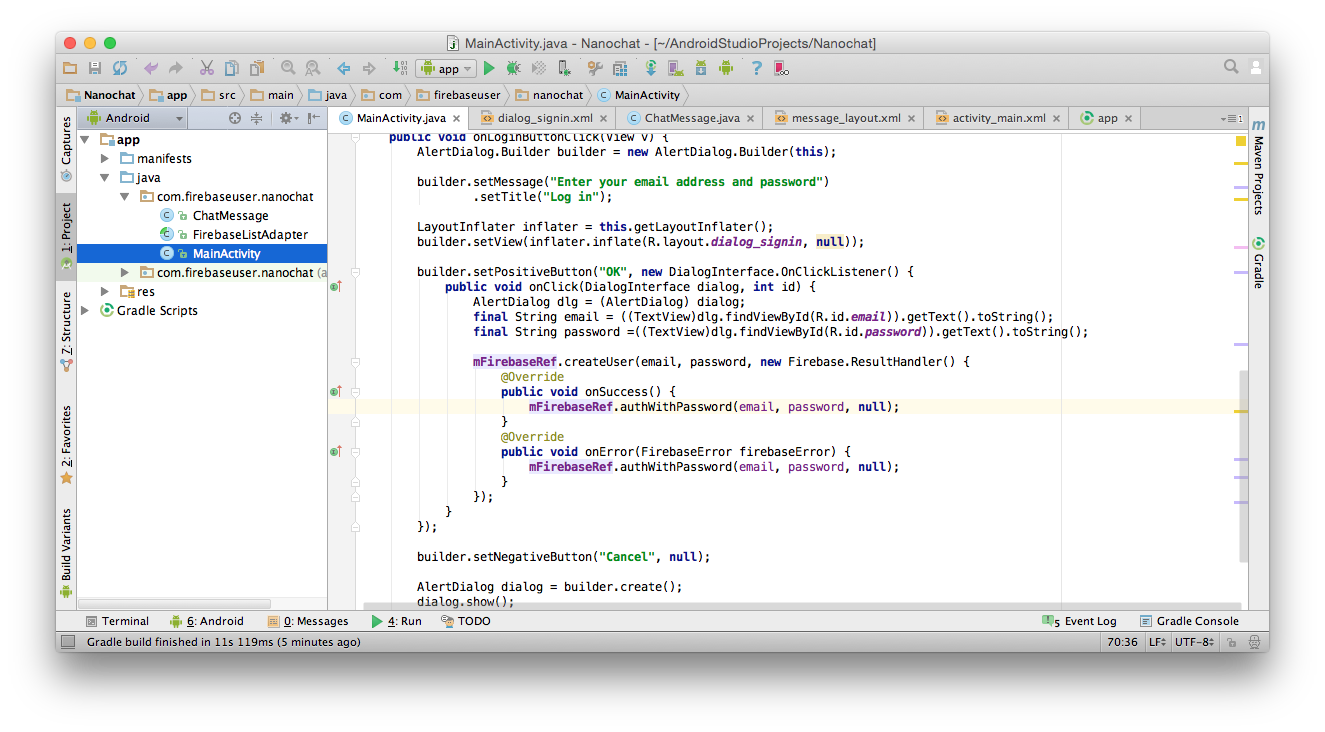
Now wire the values that we got from the dialog to the Firebase Authentication back-end. Replace the TODO with the following code:
mFirebaseRef.createUser(email, password, new Firebase.ResultHandler() {
@Override
public void onSuccess() {
mFirebaseRef.authWithPassword(email, password, null);
}
@Override
public void onError(FirebaseError firebaseError) {
mFirebaseRef.authWithPassword(email, password, null);
}
});
In this code, we always try to register the user. If the user already registered that will result in onError, otherwise it will result on onSuccess.
Either way, we next call authWithPassword to authenticate the (pre-existing or just-created) user.
- With the above we have the registration/login flow working. But we still need to listen to when Firebase Authentication tells us the user has been authenticated, so that we can store the username and use that in the chat message instead of the hard-coded value we have now.
- Add a field to the class to hold the user name:
private String mUsername; - Add the end of the onCreate method, add a callback method that listens for authentication state changes in Firebase:
mFirebaseRef.addAuthStateListener(new Firebase.AuthStateListener() {
@Override
public void onAuthStateChanged(AuthData authData) {
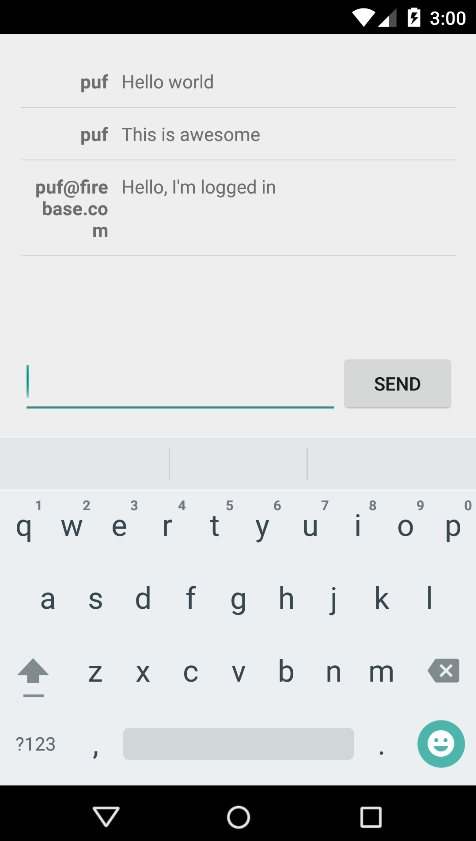
if(authData != null) {
mUsername = ((String)authData.getProviderData().get("email"));
findViewById(R.id.login).setVisibility(View.INVISIBLE);
}
else {
mUsername = null;
findViewById(R.id.login).setVisibility(View.VISIBLE);
}
}
});
Firebase calls our listener whenever the authentication state changes, so whenever the user logs in or out. When the user logs in, we store their email address in our field and hide the login button.
Firebase Authentication supports multiple authentication providers and each of them exposes a different set of data. For example, if we'd allow our users to authenticate with their existing Twitter account, we could identify them by their twitter handle. - Finally, replace the hard-coded username with the field we just populated:
mFirebaseRef.push().setValue(new ChatMessage(mUsername, message));
We could definitely improve the layout of things. But this step has been long enough as it is. So let's wrap up with a few notes. - One thing you may note is that the user stays logged in, even when they restart the app. If instead you want to sign out the user, you can call:
mFirebaseRef.unauth();
This will trigger the AuthStateListener we created before, which will clear the username field and re-enable the login button. - If you want to know which users logged in to your application, you can find them in the Login & Auth tab of your Firebase's dashboard.
This is also where you can configure the password reset emails that you can send to your users, in case they forgot their password.


Wrap-up
Congratulations! You've just built a fully functional multi-user chat application that uses Firebase to store the data and authentication users.
What we've covered
- Interacting with a Firebase Database from an Android application.
- Using Firebase Authentication in an Android application to authenticate users.
Next Steps
- Add a log-out button to the app
- Add a password-reset button to the login dialog
- Allow the user to specify a nickname or use one of the Firebase's social authentication providers to look up their first name.
- Get your app on the Play Store!
No comments?! The tutorial was AWESOME I had a functional chat in half an hour. Thank you!
ReplyDeleteFan Layout Manager for Android
DeleteUsing Fan Layout Manager you can implement the horizontal list, the items of which move like fan blades (in a circular way of a radius to your choice). To give a slightly chaotically effect to the motion, it’s possible to set an angle for the list items. So, every implementation of the library can be unique.
http://www.tellmehow.co/fan-layout-manager-android/
awesome its helps me.
ReplyDeleteIt was a great tutorial. Thanks a lot. Please send me the source code of this app so that all pieces of code are at one place. Thanks. nehaagar95@gmail.com
ReplyDeletePlease send me the source code surendra88meena@gmail.com
ReplyDeletePlease send me the source code
ReplyDeletecodeict1@gmail.com